What is Shizuku, and what can you do with it on your Android device?
The Android Debug Bridge, or ADB for short, is a handy development tool to interface with your phone for debugging and testing. Through ADB, developers and power users can access Android’s built-in Linux command line shell with greater privileges than user-installed apps. Notably, the ADB shell privilege is not equal to superuser access, hence you might still need to root your device to take complete control of the OS. However, depending on your modding requirements, the shell access is sufficient to grant or deny permissions, change system settings values, and do much more. This is where the Shizuku app comes into play.
Navigate this article:
- What is Shizuku?
- What are the features of Shizuku?
- How to download Shizuku?
- How can I install and configure Shizuku?
- How to use Shizuku?
- Conclusion
What is Shizuku?
Shizuku is a nifty solution to tackle a rather complex scenario in the Android modding world: Allowing third-party apps to access system-level Application Programming Interfaces (APIs). The idea is to run a dedicated process with shell-level permissions, which acts as a proxy between the system server and the apps. Instead of relying on running commands in the su shell, developers can then utilize the Shizuku server component to perform elevated operations.
In a nutshell, if an app needs special permissions that can only be granted through ADB (or with root), you can just use Shizuku to grant them right from your Android device.
The Shizuku project is open-source, and it has been maintained by Rikka (aka RikkaW), Haruue, and several other developers.
What are the features of Shizuku?
- Minimal performance overhead.
- Extremely fast execution (powered by Android’s inter-process communication mechanism called “binder”).
- Apps can use the Android system APIs with negligible code additions.
- On Android 11 and above, you can set up and launch Shizuku directly on your device.
How to download Shizuku?
As mentioned earlier, the Shizuku project is open-source, hence you can take a look at the codebase or compile it yourself after grabbing the sources from its official GitHub repository.
In case you are looking for the pre-compiled version of Shizuku, you can grab it directly from the Google Play Store. The developers also host several mirrors to make it easier to download the official APK release.
How can I install and configure Shizuku?
The Google Play version of Shizuku is installed by Android’s own package manager and it will continue to be updated by the Play Store. If you want to opt for the APK release from GitHub, then you need to manually sideload the package on your Android device.
Although you can use Shizuku in a non-root environment, having root access drastically simplifies the process of setting up the Shizuku’s service. Follow along with the guide below to learn how to configure Shizuku with your choice of method.
With root access
Before installing Shizuku with root access, make sure you have the latest version of Magisk installed on the target device.
- Locate the Shizuku icon and tap on it to open the app.
- On the main screen, go to the section called Start (for rooted devices).

- Tap the Start button to initiate the process.
- Press Grant to give the root permissions when requested.
- If everything goes right, the Shizuku service will start within a few seconds on a new screen, then automatically close when it’s finished.
- Scroll to the top and verify the running status of Shizuku. It should display a version number followed by “root.”

By default, the Shizuku service doesn’t automatically start itself after a reboot. To change the behavior, tap the Settings icon in the upper right corner, then locate the Start on boot (root) option. Once enabled, the Shizuku service will execute without any user intervention after you reboot your device.

It is worth mentioning that the developers of the Shizuku project are working on an advanced front-end called Sui. It’ll eventually replace the current Shizuku app. To give it a try, download the latest release from its GitHub repo. Since Sui is designed as a Magisk module, you still need Magisk to run the app.
Unlike regular companion apps, Sui doesn’t offer a typical app icon to start with. To access its interface, do one of the following:
- (Android 8.0+, Sui 12.1+) Long press system settings from the home app, you will find the shortcut of Sui.
- (Android 8.0+, Sui 12+) Enter “Developer options” in system settings, the system will ask you to add the shortcut of Sui.
- Enter
*#*#784784#*#*in the default dialer app.

While Sui has its own potential, the project isn’t feature-complete just yet. Until the migration from Shizuku’s current app to Sui is officially greenlit, it is advised to use the main Shizuku app to configure different aspects of Shizuku.
Without root access
Starting with Android 11, Google added the wireless debugging feature to Android’s developer options. It can be used to configure Shizuku’s service on the target device without root access.
- Locate the Shizuku icon and tap on it to open the app.
- On the main screen, go to the section called Start via Wireless debugging.

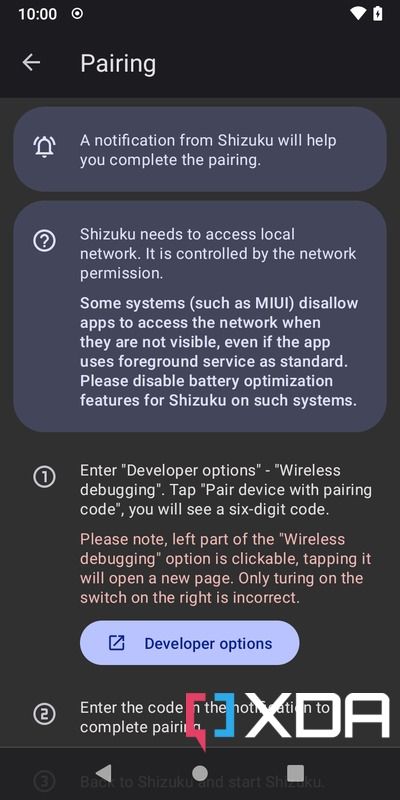
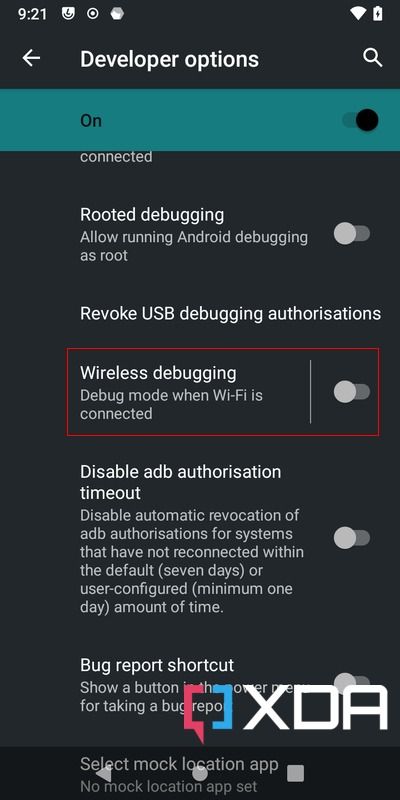
- Tap the Pairing button, then press Developer options. Next, scroll down until you find the Wireless debugging option. Turn it on.


- Check the Always allow on this network box, then press Allow to enable the feature.

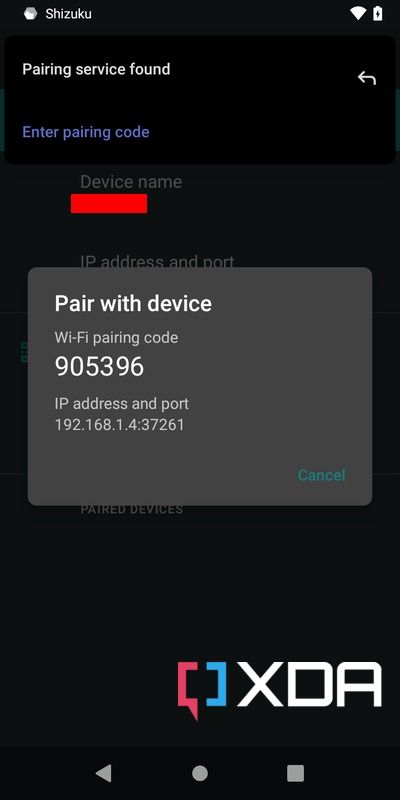
- Tap on the Wireless debugging menu. Next, select the option named Pair device with pairing code.

- Now, put the unique 6 digit Wi-Fi pairing code into the Shizuku Pairing code notification textbox.
- At this stage, you should see a Pairing successful message if the pairing code was correct.

- Return to the Shizuku app main screen.
- You might have to swipe away the Pairing successful notification before you can do that.
- Locate the Start via Wireless debugging section and tap the Start button to enable the service.
- The Shizuku service will now automatically start on a new screen, then automatically close when it’s finished.

- Scroll back to the top and verify the running status of Shizuku. It should display a version number followed by “adb.”

Keep in mind that you need to enable the “Wireless debugging” option again and restart Shizuku after restarting the target device.
It is also possible to invoke the Shizuku service via wired ADB access. This is particularly useful for older Android revisions, or some OEM Android skins where wireless debugging isn’t easily accessible. However, you need a PC/Mac with ADB installed as well as the OEM Android driver installed as prerequisites.
- Before proceeding, make sure the target device is discoverable by the ADB process on your PC/Mac.
- Type
adb devicesin the terminal window, then press Enter. You should see a unique device identifier number under List of devices attached, letting you know it is connected and recognized by the ADB interface.
- Type
- Open the Shizuku app at least once on your phone.
- Execute the following command on your PC/Mac’s terminal window:
adb shell sh /sdcard/Android/data/moe.shizuku.privileged.api/start.sh
- If successful, you should see an exit with 0 status on the terminal window within a few seconds.
- On your phone, open the Shizuku app. Then scroll back to the top and verify the running status of Shizuku. It should display a version number followed by “adb.”
Provided you follow through with all of that, you should now have a working Shizuku instance on your Android device.
How to use Shizuku?
If you’re familiar with Magisk, then Shizuku is quite similar. But instead of managing root access, it manages shell access. As a result, if you have a working Shizuku instance and then try to open an app that utilizes Shizuku to perform elevated operations, you should see a prompt to allow access. As soon as you allow it, Shizuku will seamlessly take care of the API access requirements.

It is also possible to use Shizuku in conjunction with on-device terminal emulator apps. This portion is beyond the scope of this tutorial, but you can explore this feature by tapping the “Use Shizuku in terminal apps” option on the main menu of the app.
For the Android app development community, you can easily leverage the power of Shizuku. To do so, take a look at our explainer and check out the Shizuku API repo.
Conclusion
Rooting your Android device opens it up to a world of customizations, but it’s not always a feasible option. Unfortunately, as time goes on, and Google improves its tamper detection methods, there’s less and less space left to tinker about. The Shizuku app somewhat fills the void, which is great for the Android modding scene. Hopefully, we will see a plethora of apps and mods with native support for the Shizuku service in the near future.
The post What is Shizuku, and what can you do with it on your Android device? appeared first on XDA.
from XDA https://ift.tt/AOv2xPc
via IFTTT


Aucun commentaire: